How to: configure "Battery Charging profile" to "Battery Lifetime":

How to configure “Battery Charging profile” to “Battery Lifetime” on a Datalogic Device:

For all the contexts in which it is not possible to apply any of the previous solutions, you can get in contact with the Datalogic’s Technical Support to evaluate other custom solutions, by filling the Datalogic Technical Support form .

3 Likes

Change the device’s “Battery Charging profile” to “Battery Lifetime” by using the Battery Manager User Interface.

  • Open the Datalogic Battery Manager app
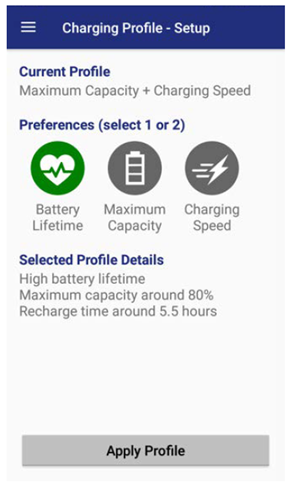
  • Open the menu and select Setup
  • Select “Battery Lifetime” and then “Apply Profile”.
    image

See also:
Battery Manager” sections in the device user’s manuals.

2 Likes

Change the device’s “Battery Charging profile” to “Battery Lifetime” by using Scan2Deploy and reading a Scan2Deploy QR Code:

  • Open Scan2Deploy Studio
  • Select Create to make a new Scan2Deploy Profile
  • Select Model, SKU, and OS
  • Leave Deployment Actions selected
  • Both “Host Profile” and “Barcode Only” will work, selecting “Barcode Only” is suggested as no host server will be needed
  • Disable Wi-Fi setup
  • Enable “Device and Scanner Settings”
  • Proceed to the next tab which should now be “Device and Scanner Settings”
  • Select the drop-down next to “Power and Charging”
  • Select the drop-down next to “Wireless Charging”
  • Enable “Charging Profile”
  • Select “Lifetime only preference” from the “Charging Profile” drop-down:
  • Proceed to the next tab “Save and Print”
  • Name and Save your Profile
  • Finally, a QR code will then appear that can be scanned via Scan2Deploy agent to change the charging profile

See also:
Scan2Deploy | Save and Print Page

1 Like

Change the device’s “Battery Charging profile” to “Battery Lifetime” by using Scan2Deploy through an intent :

  • Follow the steps mentioned in the method described above , to create a Scan2Deploy profile for changing the device’s “Battery Charging profile” to “Battery Lifetime.
  • In the “Save and Print” page select “Copy encrypted data”.

  • Apply this profile via intent as follows:

    adb shell am start -S -n com.datalogic.scan2deploy/.MainActivity –es encoding v2 -e data pasteEncryptedDataHere

See also :
News | Apply a Scan2Deploy profile through intents

1 Like

Change the device’s “Battery Charging profile” to “Battery Lifetime” by Using the Datalogic SDK in a Custom app:

The Datalogic SDKs provides the DLBatteryManager and ChargingProfile classes to manage the battery charging profile.
This is a Java example on how to use those classes:

  ChargingProfile chprof = ChargingProfile.CHARGING_PROFILE_LIFETIME
      DLBatteryManager bm = DLBatteryManager.getInstance();
      //check if the profile is supported
      for (ChargingProfile chprof : bm.getSupportedChargingProfiles()) {
          if (chprof.getId() == profile) {
             bm.setCurrentChargingProfile(chprof);
             Log.i(TAG, “applied battery profile “ + chprof.getName());
             break;
          }
      }

See also :
Datalogic SDK | DLBatteryManager class

1 Like

Change the device’s “Battery Charging profile” to “Battery Lifetime” by using the EMM’s native integration with Datalogic OEMConfig:

All EMMs (e.g., SOTI, Airwatch, SureMDM, Intune…) that support Google Enterprise also support Datalogic OEMConfig and can use it to directly configure the charging profile.
The battery charging profile management support has been introduced in OEMConfig starting from version v1.4.0. Datalogic OEMConfig is currently available in Gloogle Play store (see Datalogic OEMConfig on Google Play ) and is automatically integrated by the EMMs agents when required (no manual installation is required).

See also:
OEMConfig | Overview
OEMConfig | Release-notes

1 Like

Change the device’s “Battery Charging profile” to “Battery Lifetime” by using an EMM to apply a Scan2Deploy profile through an intent

The most part of the EMMs today available on the market provides methods to deploy packages and to broadcast intents to the target devices.
Here we provide information on how to export a Scan2Deploy profile to change the “Battery Charging profile” to “Battery Lifetime” and apply it through the deployment and scripting systems of different EMM’s.

  • create a profile with Scan2Deploy that modifies the battery profile (see link)

  • In the final “Save and Print” step select “Device storage” (see link)


    • Save the profile and use “Copy encrypted data” command

  • Applies the Scan2Deploy profile using the proper method for your EMM:

    • SOTI

      • Create a ‘SOTI package’ that transfer the tar file
      • Apply it through this intent script:
        sendIntent -b "intent:#Intent;component=com.datalogic.scan2deploy/.S2dServiceReceiver;action=datalogic.scan2deploy.intent.action.START_SERVICE;S.encoding=v2;S.data=pasteEncryptedDataHere;end"
    • AirWatch:

      • Create an AirWatch ‘Product’ that transfers the .tar file
      • Apply it through this intent script:
        mode=explicit,broadcast=true,action=datalogic.scan2deploy.intent.action.START_SERVICE,package=com.datalogic.scan2deploy,class=com.datalogic.scan2deploy.S2dServiceReceiver,extraString=encoding=v2,extraString=data=pasteEncryptedDataHere
    • SureMDM:

      • Create a ‘File transfer job’ that transfer the tar file
      • Apply it through this intent script:
        am start -S -n com.datalogic.scan2deploy/.MainActivity -e data pasteEncryptedDataHere

See also:
Scan2Deploy | Save and Print Page
News | Apply a Scan2Deploy profile through intents
News | Managing SureLock or SureFox using Scan2Deploy and SureMDM
Topic | How to: configure “Battery Charging profile” to “Battery Lifetime”

2 Likes