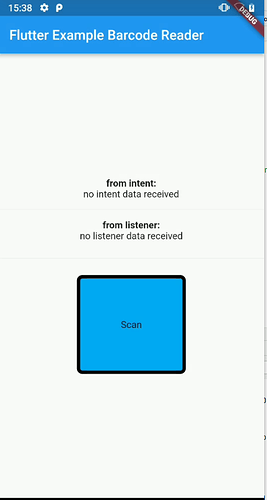
This is an example that wants to show how a Flutter application could be integrated with Datalogic SDK.
The example is written in Kotlin for the native part.
We are assuming to have a Flutter application already been created by following the tutorial Install | Flutter .
The purpose of the app is to show how to:
- Receive a barcode content in the Android part and transmit it to Flutter part
1.1 – through System Intent (by using the Datalogic Intent Wedge)
1.2 – through code (by using SDK Read Listener) - Enable/disable the Scan Engine’s Triggers
Overview
A Flutter application is made up of a Dart part common to several operating systems and a part specific to the operating system on which the application is running, in this case, Android.
(see more at: Writing custom platform-specific code | Flutter)
When a barcode is read, the value is passed from Android part of the app to the Flutter application via an EventChannel.
Upon reading the barcode, the content is received in the native Android part of the app and
the code will then be transmitted to the Flutter part using the mechanisms provided.
1 - Receive a barcode content in the Android part and transmit it to Flutter part
1.1 - Receive a barcode through Datalogic Intent Wedge
Android code:
A broadcast receiver is registered and is waiting for data coming from Datalogic Intent Wedge.
When a new code is received a Flutter EventChannel is used to pass the code from the Android code to Flutter code.
class MainActivity: FlutterActivity() {

      private val ACTION_BROADCAST_RECEIVER =  "com.datalogic.decodewedge.decode_action"
      private val CATEGORY_BROADCAST_RECEIVER = "com.datalogic.decodewedge.decode_category"
      private val EXTRA_DATA_STRING = "com.datalogic.decode.intentwedge.barcode_string"
      private val EVENT_CHANNEL_BARCODE_INTENT = "app.channel.event.barcode_intent"
      private var receiver: BroadcastReceiver? = null
      private var filter: IntentFilter? = null

  	 override fun configureFlutterEngine(@NonNull flutterEngine: FlutterEngine) {
           super.configureFlutterEngine(flutterEngine)

  		 EventChannel(flutterEngine.dartExecutor.binaryMessenger, EVENT_CHANNEL_BARCODE_INTENT).setStreamHandler(
  				object : EventChannel.StreamHandler {
  					override fun onListen(args: Any?, events: EventChannel.EventSink) {

  						receiver = BarcodeIntentReceiver(events)
  						filter = IntentFilter()
  						filter!!.addAction(ACTION_BROADCAST_RECEIVER)
  						filter!!.addCategory(CATEGORY_BROADCAST_RECEIVER)
  						registerReceiver(receiver, filter)


  					}

  					override fun onCancel(args: Any?) {
  						//Log.i(LOGTAG, "EVENT_CHANNEL_BARCODE_INTENT has been canceled")
  					}
  				}
  			)
  	}
    private fun BarcodeIntentReceiver(events: EventSink?) : BroadcastReceiver? {
          return object : BroadcastReceiver() {
              override fun onReceive(context: Context, wedgeIntent: Intent) {
                  //Log.i(LOGTAG, "received" + wedgeIntent.action)
                  val action = wedgeIntent.action

                  if (action == ACTION_BROADCAST_RECEIVER) {

                      barcode_text = wedgeIntent.getStringExtra(EXTRA_DATA_STRING)
                      events?.success(barcode_text)

                      //Log.i(LOGTAG, "Decoding Broadcast Received")
                  }
              }
          }
      }
  }
Flutter code:
In the Flutter code we can use a EventChannel listener inside a StatefulWidget to wait for the barcode coming from the Android part:
 class IntentBarcodeReader extends StatefulWidget {
 	  const IntentBarcodeReader({Key? key}) : super(key: key);
  	  @override
  	  State<IntentBarcodeReader> createState() => _IntentBarcodeReaderState();
  	}

  	class _IntentBarcodeReaderState extends State<IntentBarcodeReader> {
  	  static const EventChannel scanChannel = EventChannel('app.channel.event.barcode_intent');
  	  String barcode = "no intent data received";

  	  @override
  	  void initState() {
  		super.initState();
  		print("init state ");
  		scanChannel.receiveBroadcastStream().listen(_onEvent, onError: _onError);
  	  }

  	  void _onError(dynamic data) {
  		print("Error");
  	  }

  	  void _onEvent(dynamic data) {

  		setState(() {
  		  barcode = data;
  		});
  	  }

  	  @override
  	  Widget build(BuildContext context) {
  		return Text(barcode);
  	  }
  	}
1.2 - Receive a barcode through Datalogic SDK
Android code:
A ReadListner is registered and is waiting for data coming from the Scan Engine.
When a new code is received a Flutter EventChannel is used to pass the code from the Android code to Flutter code.
class MainActivity: FlutterActivity() {

private var decoder: BarcodeManager? = null
private var listener: ReadListener? = null
private val EVENT_CHANNEL_BARCODE_LISTENER = "app.channel.event.barcode_listener"

override fun configureFlutterEngine(@NonNull flutterEngine: FlutterEngine) {
         super.configureFlutterEngine(flutterEngine)

         EventChannel(flutterEngine.dartExecutor.binaryMessenger, EVENT_CHANNEL_BARCODE_LISTNER).setStreamHandler(
 					object : EventChannel.StreamHandler {
 						override fun onListen(args: Any?, events: EventChannel.EventSink) {
 							try {
 								decoder = BarcodeManager()
 								// Create an anonymous class.
 								listener = ReadListener { decodeResult ->
 									events?.success(decodeResult.text)
 								}
 								decoder!!.addReadListener(listener)

 							} catch (e: DecodeException) {
 								//Log.e(LOGTAG, "Error while trying to bind a listener to BarcodeManager", e)
 							}
 						}
 						override fun onCancel(args: Any?) {
 							//Log.i(LOGTAG, "EVENT_CHANNEL_BARCODE_LISTNER has been canceled")
 						}
 					}

 				)

  }
}
Flutter code:
In the Flutter code, we can use an EventChannel listener inside a StatefulWidget to wait for the barcode coming from the Android part.
The Widget is programmed like the previous one (point 1.2) only the channel on which it is waiting is changed, this widget is waiting on channel ‘app.channel.event.barcode_listener’ :
class ListenerBarcodeReader extends StatefulWidget {
   const ListenerBarcodeReader({Key? key}) : super(key: key);

   @override
   State<ListenerBarcodeReader> createState() => _ListenerBarcodeReaderState();
 }
 ...


 class _ListenerBarcodeReaderState extends State<ListenerBarcodeReader> {
   static const EventChannel scanChannel = EventChannel('app.channel.event.barcode_listener');
 ...
The previous examples are showing a communication through ChannelEvent from Activity to Flutter, in the second part is shown Flutter that calls the Activity throught a MetodChannel:
2 - Enable/disable the Scan Engine’s Triggers
Android code:
class MainActivity: FlutterActivity() {

private var decoder: BarcodeManager? = null

 private val METHOD_CHANNEL_BARCODEMANAGER = "app.channel.method/barcodemanager"

 override fun configureFlutterEngine(@NonNull flutterEngine: FlutterEngine) {
 			super.configureFlutterEngine(flutterEngine)


 		   MethodChannel(flutterEngine.dartExecutor.binaryMessenger, METHOD_CHANNEL_BARCODEMANAGER).setMethodCallHandler {
 						call, result ->
 					if (call.method == "startTrigger") {
 						//Log.i(LOGTAG, "startTrigger MethodChannel Called")
 					   var bm = BarcodeManager()
 						bm.pressTrigger()
 					}

 					if (call.method == "stopTrigger") {
 						//Log.i(LOGTAG, "stopTrigger MethodChannel Called")
 						var bm = BarcodeManager()
 						bm.releaseTrigger()
 					}
 				}
 	}
}
Flutter code:
In the Flutter code, we can use a MethodChannel inside a StatefulWidget that through a GestureDetector appropriately invoke the methods of the Android part.
 	class DecodeButton extends StatefulWidget {
 	  const DecodeButton({Key? key}) : super(key: key);

 	  @override
 	  State<DecodeButton> createState() => _DecodeButtonState();
 	}

 	class _DecodeButtonState extends State<DecodeButton> {
 	  static const platform = MethodChannel('app.channel.method/barcodemanager');
 	  bool _hasBeenPressed = false;

 	  @override
 	  void initState() {
 		super.initState();
 		print("init state ");
 	  }

 	  @override
 	  Widget build(BuildContext context) {
 		return GestureDetector(
 		  onTapDown: (_) { startTrigger();},
 		  onTapUp: (_) { stopTrigger();},
         onPanEnd:(_){stopTrigger();},
 		  child: Container(
 			padding: const EdgeInsets.all(60.0),
 			decoration: BoxDecoration(
 			  color: _hasBeenPressed ? Colors.amber : Colors.lightBlue,
 			  borderRadius: BorderRadius.circular(8.0),
 			  border : Border.all(width: 5),
 			),
 			child: const Text('Scan'),
 		  ),
 		);
 	  }

 	  void startTrigger() async {
 		try {
 		  print('called startTrigger()');
 		  platform.invokeMethod('startTrigger');

 		  setState(() {
 			_hasBeenPressed=true;
 		  });

 		} on PlatformException catch (e) {
 		  "Failed to get startTrigger: '${e.message}'.";
 		}
 	  }

 	  void stopTrigger() async {
 		try {
 		  print('called stopTrigger()');
 		  platform.invokeMethod('stopTrigger');

 		  setState(() {
 			_hasBeenPressed=false;
 		  });

 		} on PlatformException catch (e) {
 		  "Failed to get stopTrigger : '${e.message}'.";
 		}
 	  }

 	}
This app is an example and it is not intended to be a complete guide to integrate Flutter with the Datalogic SDK.
At this link, it is possible to download the apk, note that before receiving the barcode via intent, the intent wedge must be active and the configuration parameters (action, category, etc.) must be at default values.

