This article want to show the different kind of Scan2deploy intents you can send with Soti. By default Scan2deploy uses the intent with the encrypted data. This works fine but sometimes there are more convenient options. This article will provide 3 additional intents:
- Install a Scan2deploy project (tar) file by providing the file name
- Install a Scan2deploy JSON file.
- Install a JSON (unencrypted file)
Encrypted Data (Default)
Scan2Deploy Studio offers the ability in the Save and Scan page to create a Soti Mobicontrol intent:
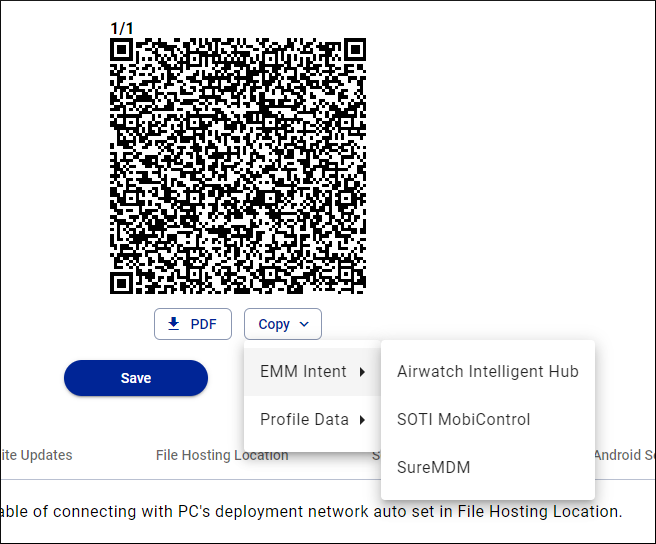
This will give you an intent like this:
sendIntent -b "intent:#Intent;component=com.datalogic.scan2deploy/.S2dServiceReceiver;action=datalogic.scan2deploy.intent.action.START_SERVICE;S.encoding=v3;S.data=lNx7XG/TEjvsO91BaolNcccw1ghCC9PVXqRqUckM2HEGgEFJX+ZJwh/hkh/KJ1ZTzuC2ZrTsSgszPS6sZ05H0P1fYinCcNxS8SjyPIR32KPTWncODdkf6aIAYc5nYX4clbEPCxNzqssawjr4P76U28zJhUX5Ttu7uitf7FGivRa3fya9E3yTZSwjwntZvLgHmls9mGsZwE/yP4QX9qjlyx6hTTfGcM/iXtU8iY3ZVYwPyMMk/DMOqDLS03uCsHXwCXSCZYIz1I4EUPg0FcjzlYuNBtweyH1g3O5wjdMcs4pBMcHWmONdaPnhF/H5puTQVv9xDvnCgFUaNAWkUFW8qaJqXBF+SI3LcPh80YfBLfa7fxTbAWhADvBr/qLFm68oPL/pbgN1dASDqWtGvnnjlF6J2Q546FRdo2hUv2nJcaqk4vSPuRMimazRKQhK11ooJQ7L5sK2MlVeMoGu1zUZO2OQk7Vog/Go0TPyXzVqITqdvUAEIsggvJQHx1imWQCh7/YOUMIULNAFzb00OXe1fyuJuiO3b8CwWZ3gfhxxb9NIxMSjqHqYRDtKO55QWPm9KetEGLayQ5INJfJeUl61IFLg+7UY+R3/YGIqAy6ylpiH+zvG63ORA0JyQXcDXXW6Ddxea8/6Fg7abS6glmABa0Oj7WnALvW0vy2gPuRCCwiSScjjkVW55pHK55QENTQE;end"
You can use this (legacy) intent directly in Soti or in the Soti Package builder. More info can be found here:
This in convenient but sometimes confusing if you cannot see exactly what happens in the script.
Scan2Deploy tar file
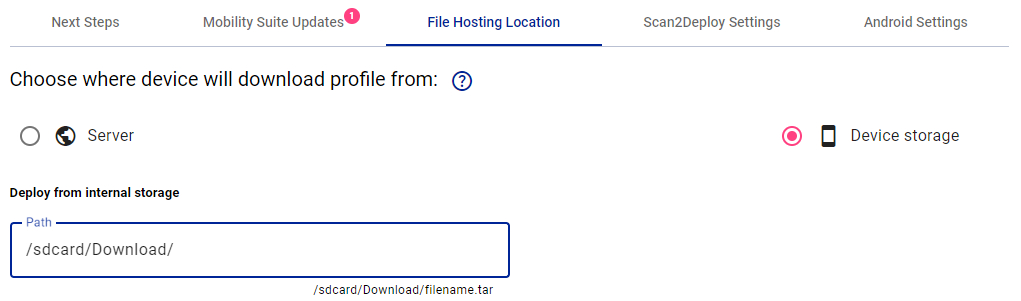
If you want to install a Scan2Deploy Host file project. It is also possible to use the following intent where you provide the file name:
sendIntent -b "intent:#Intent;component=com.datalogic.scan2deploy/.S2dServiceReceiver;action=datalogic.scan2deploy.intent.action.START_SERVICE;S.profile-path=sdcard/Download/filename.tar;end"
This way you don’t have to change the script every time you update the tar file.
Make sure you put the File Hosting location to Device Storage before saving the project:
Scan2Deploy JSON file
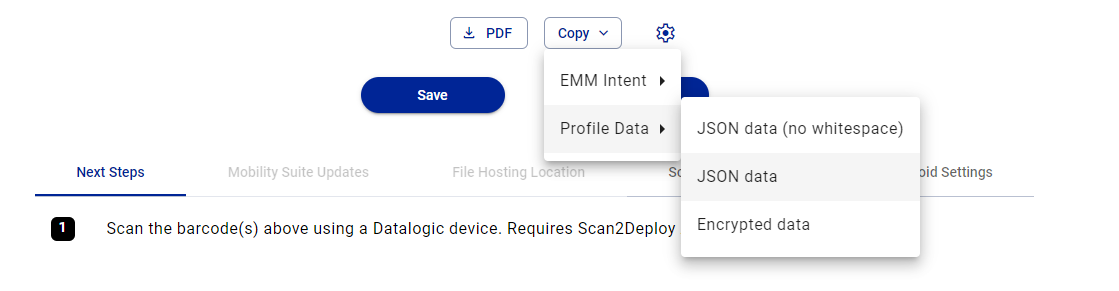
It is also possible to import a JSON file that is on the terminal. You can create a JSON with Scan2Deploy Studio using the copy to JSON data function.
Save the data in a JSON file and place it on the terminal (using package builder)
The Soti intent looks like this:
sendIntent -b "intent:#Intent;component=com.datalogic.scan2deploy/.S2dServiceReceiver;action=datalogic.scan2deploy.intent.action.START_SERVICE;S.json-path=sdcard/Download/filename.json;end"
Off course you can manually create or edit the JSON file.
This option can be very handy when you are a Datalogic integrator and often has to use the same settings at different customers.
Scan2Deploy JSON intent
The last option can be used to send the (unencrypted) content of a JSON file directly with an intent. Very handy for the one setting you forgot.
The Soti intent looks like this:
sendIntent -b "intent:#Intent;component=com.datalogic.scan2deploy/.S2dServiceReceiver;action=datalogic.scan2deploy.intent.action.START_SERVICE;S.encoding=json;S.data={\"global\":{\"oemconfig\":true},\"app-config\":{\"com.datalogic.settings.oemconfig\":{\"ScannerSettings\":{\"SymbologySettings\":{\"BarcodeSettings\":{\"Code128\":{\"c128_L2Length\":99},\"EAN13\":{\"ean13_sendChecksum\":true},\"EAN8\":{\"ean8_sendChecksum\":true}}}}}},\"app-version\":{\"com.datalogic.settings.oemconfig\":12001},\"settings\":{\"lock-screen\":false}};end"
The easiest way to retrieve this data is to use the copy to JSON data (no whitespace) option. Where I manually removed the $schema section to make it somewhat shorter.
Quotes
Tip! Make sure you use straight quotes and not fancy or curly quotes. Otherwise Soti will not execute your script!
Documentation