Installing Datalogic QuickBoard does not automatically make it active and visible to users. Like any Android IME, QuickBoard has to be enabled and then selected as the active default before it replaces the current system keyboard. This post covers how to do both without any user interaction, so it can run as part of an automated staging profile.
Prerequisites
- A device running Android 11 or above. QuickBoard is not supported on Android 10 or earlier.
- QuickBoard installed on the device. It is not preinstalled — add it from the Mobility Suite Updates table on the Scan2Deploy Studio Save and Scan page.
- Scan2Deploy Studio, and/or Datalogic OEMConfig through your EMM.
What actually has to change
Two Android secure settings govern which keyboard the device uses:
| Setting | Purpose |
|---|---|
enabled_input_methods |
The list of IMEs the user is allowed to switch to |
default_input_method |
The IME that is actually active |
For QuickBoard, both must reference the component com.datalogic.ime/.ImeService.
Setting only the first gives you a QuickBoard that is available but not in use — which is exactly the symptom people report as “I applied the profile and nothing changed”.
Method 1 — Device and Scanner Settings / OEMConfig
This is the supported, declarative way to express the configuration, and the one to reach for first.
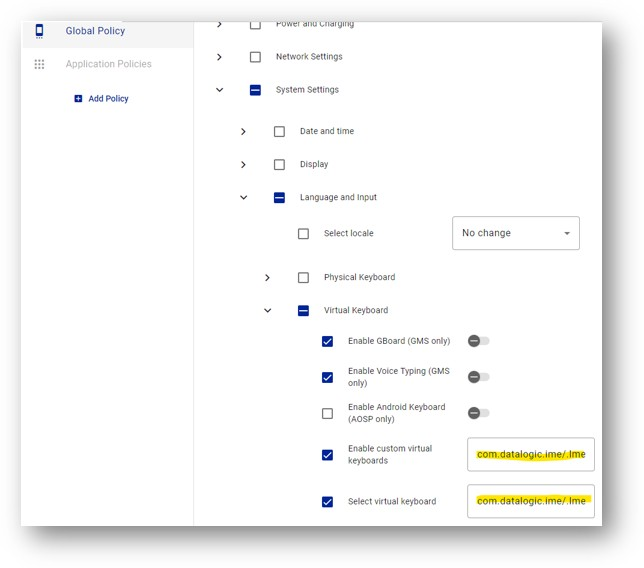
In Scan2Deploy Studio, open Device and Scanner Settings → System Settings → Language and Input → Virtual Keyboard. The identical parameters are exposed by OEMConfig under System Settings → Language and Input → Virtual Keyboard, so the same configuration can be applied from Intune or any other EMM that supports OEMConfig.
Set the following:
| Setting | Value |
|---|---|
| Enable GBoard (GMS only) | false |
| Enable custom virtual keyboards | com.datalogic.ime/.ImeService |
| Select virtual keyboard | com.datalogic.ime/.ImeService |
Depending on your requirements you may also want to disable Enable Voice Typing.
[screenshot: OEMConfig Virtual Keyboard section with the two fields filled in]
Remark
QuickBoard settings supplied by Scan2Deploy or an EMM take precedence over values set locally in the app — but only while the device is willing to accept them.
Once an administrator configuration has been applied, the QuickBoard settings screen on the device shows an extra switch labelled Override administrator settings. When that switch is enabled, QuickBoard ignores everything the administrator sends and uses the local values instead.
In earlier versions the switch could be turned on automatically as soon as someone changed a setting directly on the device — even when the switch itself was hidden. If administrator settings appear to have no effect, this is the first thing to check.
Note
On some firmware versions and device models this path correctly applies the QuickBoard configuration but does not switch the active IME. If the keyboard does not change, update the device to the latest firmware release, then, if the FW upgrade is not enough, use Method 2.
The two methods 1 & 2 can also be combined in the same profile without conflict.
Method 2 — Writing the settings directly
The same two settings can be written directly in the device configuration through ADB or other scripting methods. This operates at a lower Android API level and works consistently across firmware versions and device models.
2.1 - Testing over ADB
To confirm that the values behave as expected on your device, you can use the following ADB commands:
bash
adb shell settings put secure enabled_input_methods com.datalogic.ime/.ImeService
adb shell settings put secure default_input_method com.datalogic.ime/.ImeService
2.2 - Applying it from a Scan2Deploy profile through Script
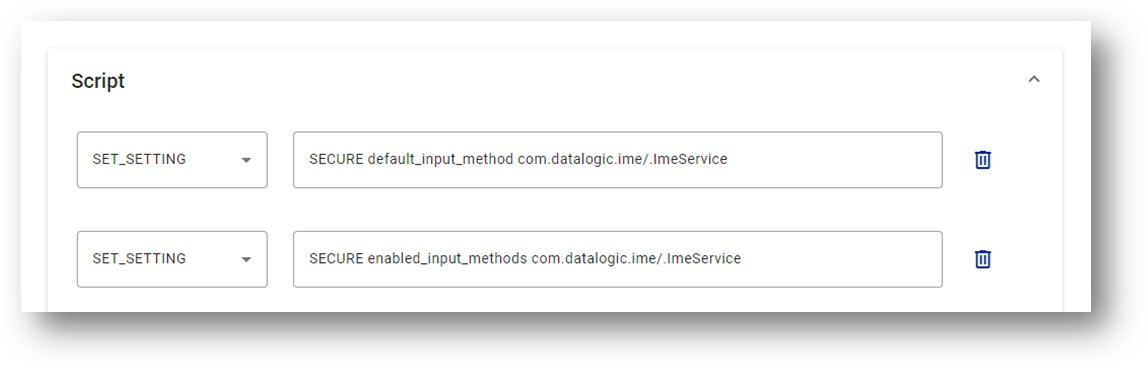
Once verified, move the same commands to the Scripts page of your Scan2Deploy profile:
SET_SETTING SECURE enabled_input_methods com.datalogic.ime/.ImeService
SET_SETTING SECURE default_input_method com.datalogic.ime/.ImeService
[screenshot: Scan2Deploy Studio Scripts page with the two SET_SETTING commands]
Devices with a physical keyboard
On a Skorpio X40/45, Skorpio X5, Falcon X60/65 or any other device with a hardware keyboard, there is an additional obstacle. After a factory reset, the Android option Settings → System → Language and Input → Physical Keyboard → Use on-screen keyboard is disabled by default, which suppresses every virtual keyboard — QuickBoard included. No matter how you change the IME settings, the keyboard will not appear until the problem is resolved.
The setting behind it, show_ime_with_hard_keyboard, is not part of the Android Enterprise Management API, so it is not exposed as a configurable item in OEMConfig, SOTI MobiControl, Intune or any other EMM. It has to be set by the user manually, or written directly.
With the following command, You can change that setting or test it through ADB:
bash
adb shell settings put secure show_ime_with_hard_keyboard 1
Applying it from a Scan2Deploy profile, on the Scripts page:
SET_SETTING SECURE show_ime_with_hard_keyboard 1
Note: If your devices have no physical keyboard, this section does not apply.
Putting it together (Enable, Make Default, Show Ime With Hard Kbd)
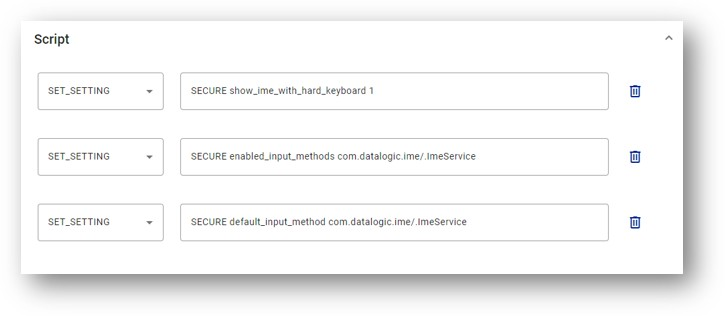
In Scan2Deploy Studio, a Scripts page covering all three settings looks like this:
SET_SETTING SECURE show_ime_with_hard_keyboard 1
SET_SETTING SECURE enabled_input_methods com.datalogic.ime/.ImeService
SET_SETTING SECURE default_input_method com.datalogic.ime/.ImeService
[screenshot: Scripts page with all three commands]
This configuration has been verified on Memor 17 and on Skorpio X5 running Android 13.
Troubleshooting
-
The profile applies but the keyboard does not change. Check
default_input_method, not justenabled_input_methods:
.
bash
adb shell settings get secure default_input_method
.
If it does not returncom.datalogic.ime/.ImeService, the selection step did not take effect — use Method 2. -
Settings pushed from the EMM seem to be ignored. Check the Override administrator settings switch on the device, as described in the Remark above.
-
Nothing seems to run at all. Check the Scan2Deploy Agent log — either through Previous Log in the Agent UI, or at
/sdcard/Android/data/com.datalogic.scan2deploy/files/log.txt. It records every stage of the profile and the reason for any failure. -
Old firmware. Several IME-related issues disappear after a firmware update. Firmware for each product is available from the Datalogic Developer Portal.
Delivering this through an EMM
If you need these settings applied without scanning a QR code, Scan2Deploy Agent accepts profile data through a broadcast intent — see Apply a Scan2Deploy profile through intents.
References
- QuickBoard — Overview and setup
- QuickBoard Settings — EMM configuration and the override switch
- OEMConfig — System Settings, Virtual Keyboard
- Scan2Deploy Studio — Device and Scanner Settings
- Scan2Deploy Studio — Scripts page
- Scan2Deploy Studio — QuickBoard layout editor
- Related thread: Change default IME with QuickBoard via Scan2Deploy / Omnissa
Simone Callegari
Datalogic Mobile Products — L3 Specialist SW Engineer